Set up your DAW
Otherwise it's just a fancy paperweight.
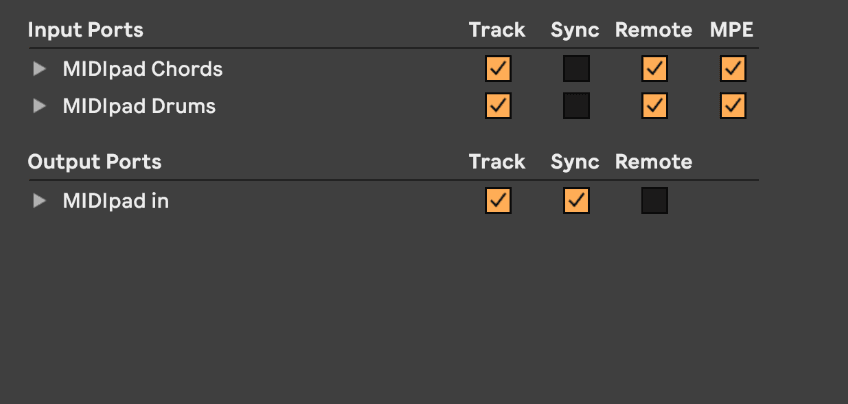
MIDIpad turns up on your system as two MIDI output devices: MIDIpad Chords and MIDIpad Drums, and one input, MIDIpad in, and has them open at all times the app itself is open.
MIDIpad in takes your DAW's MIDI clock, so Drums follows its tempo and its Start and Stop, and the automation CCs listed in App settings. In some cases you might need to adjust for latency by setting the DAW's clock sync delay to a negative number to keep everything tight, depending on your DAW. On my computer, Logic Pro has absolutely no trouble with the defaults, but Ableton Live needs a -21ms clock sync delay. The rule of thumb I've found for this is to find whatever the overall latency reporting says and add 2-4ms to it, then make it negative. You can also play along with MIDIpad Drums with the DAW's metronome activated and tune it by ear.
MIDIpad Chords and MIDIpad Drums both send MPE and CC in the full version, so make sure your DAW is aware of that appropriately for remote control. You shouldn't need to send clock sync delay to either of them, leave that to MIDIpad in.
Chords
One thing worth knowing about Chords going in: MIDIpad controls how long each string sounds and how its energy fades and swells, and your synth decides everything else. That might seem obvious, but because MIDIpad doesn't work like a normal MIDI controller, some of its behaviours can be surprising when you first start using it. Experiment with the instrument controls to find the right settings for your patch (Dynamics and String sustain are the first controls to dial in most of the time) and if something sounds strange, check to see whether the patch has MPE pressure or slide configured to reduce things rather than raise them, as MIDIpad Chords is designed for both of these signals to swell upwards, if they push downwards it can sound weird.
Create a MIDI/instrument track, set its input to MIDIpad Chords, arm it, and play. If your DAW asks which channel to listen on, leave it on all of them.
Chords channels, in Settings → MIDI, sets how the port is laid out:
- MPE - the default. Enable MPE on the track or synth (most modern DAWs and synths have one toggle for it) to get each of the six strings as its own voice, carrying its own pressure and timbre.
- Multi-channel - one string per channel from channel 1, with no master channel. Make six tracks, filter each to one channel, and put a different instrument on each. No MPE support is needed. Or move strings onto the same channel, in the String channels rows under the setting, and share them out between fewer tracks.
- Poly aftertouch and Single channel - everything on one channel, for synths that want it that way.
The full account of each is in MIDI and MPE.
Drums
Create a track with its input set to MIDIpad Drums and point it at a drum instrument. The notes are standard General MIDI percussion - kick, snare and hats land where every GM-mapped kit already expects them - and the four notes can be moved in Settings → MIDI.
Drums channels works the same way as the Chords setting:
- MPE - the default: each drum on its own channel behind a master (the kick on 2, the snare on 3, the hi-hats on 4), with how far you push its control sent alongside as pressure and slide.
- Multi-channel - the same with no master: the kick on 1, the snare on 2, the hi-hats on 3. One track per drum, no MPE needed.
- Single channel - everything on channel 1, notes and velocity only.
On a Sony pad the touchpad is a crossfader on CC 16, channel 1.
Clock
If you want Drums running in time with your project instead of off at their own tempo (which you do, believe me), send MIDI clock from your DAW to the MIDIpad in port. See Tempo and time signature.
Per-DAW guides are coming
I'm writing step-by-step guides for Ableton Live, Logic Pro, Bitwig, Cubase, Reaper and FL Studio, and they'll go up here as they're done. It's the same shape in all of them anyway: enable MIDIpad Chords and MIDIpad Drums wherever your DAW lists its MIDI devices, make a track for each, set its input, and arm it. Sync MIDIpad in to your DAW's clock and account for any latency that crops up and everything'll lock together.
Channel-by-channel and message-by-message specifics live in the MIDI reference.